


How to Operate a Toilet Seat Cover Making Machine: A Beginner's Tutorial
That neat stack of sealed, folded toilet seat covers beside a public restroom sink looks simple, but every single cover starts as a wide roll of nonwoven fabric or laminated paper. Between the roll and the finished product stands a toilet seat cover making machine — an automated line that unwinds the raw material, seals or glues its edges, punches out the seat contour, cuts each cover free, folds it into a pocket-sized square and delivers it ready for packaging. This tutorial is written for beginners. It explains what this equipment is, how it works, and how to operate a toilet seat cover making machine safely and consistently, step by step, in plain language — no engineering degree required. By the end, you will be able to take a toilet seat cover making machine from a cold start to end-of-shift cleanup with confidence.
Key Takeaways
A toilet seat cover making machine converts rolls of PP nonwoven fabric (sometimes laminated with a PE film) into finished, folded, single-use toilet seat covers in one continuous process.
Most disposable covers are made from polypropylene (PP) spunbond nonwoven of about 20–40 g/m²; glued-type machines instead feed laminated paper or laminated nonwoven together with release paper.
The main components are the material rack, tension control system, servo feed rollers, sealing unit, punching and cutting module, folding system and PLC touchscreen panel.
A typical automatic toilet seat cover making machine runs at 80–100 pieces per minute and needs only one operator for normal supervision.
Beginners can master operation quickly, because parameter changes — cover length, folding style and speed — are entered on a touchscreen with no mechanical retooling.
What Is a Toilet Seat Cover Making Machine?
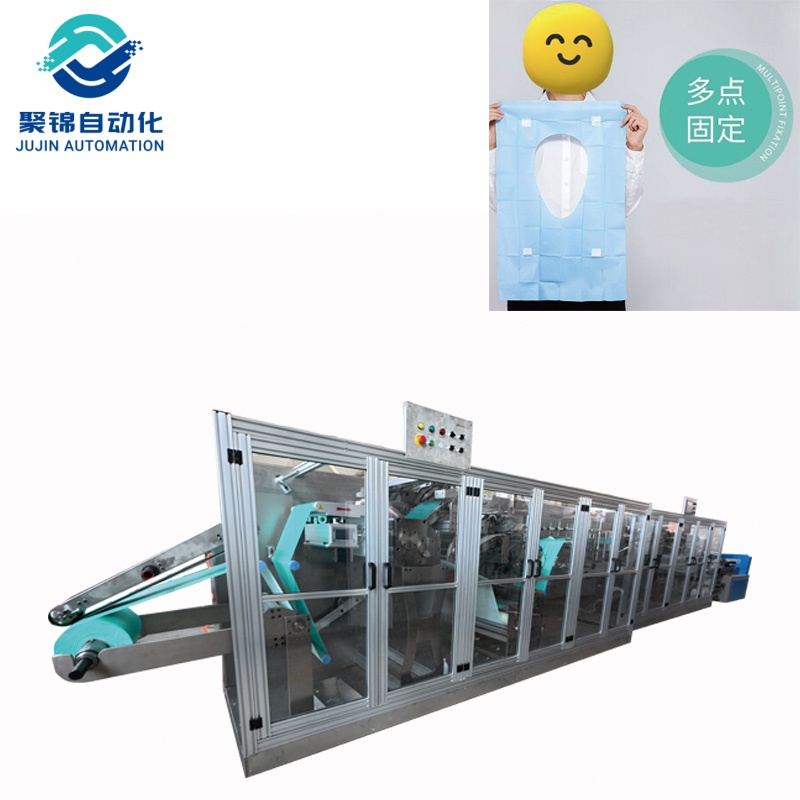
A toilet seat cover making machine — also called a disposable toilet seat cover machine or a toilet seat pad production line — is industrial converting equipment that turns raw-material rolls into finished, ready-to-use disposable toilet seat covers with minimal manual handling. Between cycles there is no hand cutting and no hand folding: the machine feeds the material, forms the cover, seals or glues the edges, punches the seat contour, cuts each piece free, folds it and stacks it.
Two main designs exist. Ultrasonic-welded machines bond nonwoven fabric with high-frequency vibration and are common for soft, waterproof pocket-style covers. Glued machines apply a small amount of spray adhesive and suit covers that need an adhesive strip for fixing onto the toilet seat. Both types share the same workflow, and this guide covers the principles that apply to any modern toilet seat cover making machine.
Why the Raw Material Matters
Understanding the material makes the machine easier to understand. A disposable toilet seat cover is not woven or knitted like normal cloth. It is made of nonwoven fabric — a sheet of fibres bonded together by heat, pressure or chemicals. The most common raw material is polypropylene (PP) spunbond nonwoven: melted polymer is extruded into fine continuous filaments, laid into a web and thermally bonded. The result is a fabric that is soft, breathable, tear-resistant and cheap enough to use once and discard.
Fabric weight, measured in grams per square metre (g/m², also called GSM), is the most important parameter because it affects softness, strength, opacity and cost. Disposable toilet seat covers are usually made from 20–40 g/m² material, and some waterproof versions laminate a PE film under the nonwoven. When you set up a new toilet seat cover making machine, the material weight and roll quality you choose directly affect sealing results and cost per piece. The nonwovens industry publishes detailed background on how these engineered fabrics are made and where they are used.
| Material | Typical GSM | What It Means for the Cover |
|---|---|---|
| PP spunbond (standard) | 20–30 g/m² | Light and economical; the most common choice for disposable seat covers |
| PP spunbond + PE film | 25–40 g/m² | Adds a waterproof bottom layer; used for travel and premium covers |
| Laminated paper / nonwoven | Paper-based | Used on glued-type machines for self-adhesive covers |
Know the Main Components Before You Start
Whatever brand you operate, the anatomy of a toilet seat cover making machine is the same. Each component has one job, and if any part is misaligned, the quality of every cover is affected. Take a few minutes to identify the components below before switching the machine on — learning the components of a toilet seat cover making machine before your first shift will save you from most common beginner mistakes.
1. Material Rack (Unwinding Unit)
This is where the raw-material rolls are loaded. The rack supports the rolls and keeps the material feeding angle stable, so unwinding stays smooth and wrinkle-free. On typical lines, rolls can be up to about 1000 mm in diameter — a bigger roll means fewer changeovers per shift.
2. Tension Control System
Lightweight nonwoven and PE film stretch and wander easily. Automatic cylinder-driven tension control keeps the feeding force low and constant, which prevents wrinkles, stretching and wasted material at high speed.
3. Servo Feed and Traction Rollers
These rollers decide how far the material advances per cycle, which directly controls the finished cover's length. On modern machines they are servo-synchronized with the sealing and cutting units to within a few millimetres of precision.
4. Sealing Unit
On an ultrasonic toilet seat cover making machine, high-frequency vibration — typically about 20–35 kHz — melts and fuses the fibres into a strong, clean, leak-proof edge without thread or glue. Glued machines instead apply spray adhesive through a suction-drum transfer system with servo-controlled positioning.
5. Punching and Cutting Module
After sealing, the punching unit shapes the seat contour and the cutting module separates each cover from the web. The cutting mould is made of mould steel, and a well-adjusted line keeps cutting-size error within about 3 mm.
6. Folding System
A large piece of material must be compressed into a small package for travel and retail. The folding module performs a longitudinal fold followed by transverse folds — typically a three-fold — and outputs neat, compact squares ready for bagging.
7. PLC Touchscreen Panel
The brain of the line. Operators enter cover length, speed, sealing energy or adhesive amount, and folding settings directly on the touchscreen. The PLC then coordinates all servo motors, the sealing unit and pneumatic cylinders, so changing product size takes minutes rather than hours.
| Component | Primary Function | What to Check During Operation |
|---|---|---|
| Material rack | Supports and unwinds raw-material rolls | Roll alignment and splice joints |
| Tension control | Maintains constant, low-tension feeding | Wrinkle-free material path |
| Servo feed rollers | Control advance speed and cover length | Consistent cover dimensions |
| Sealing unit | Bonds or glues edges without thread | Seal strength and edge finish |
| Punching / cutting module | Shapes and separates each cover | Mould wear and cutting accuracy |
| Folding system | Compacts covers for packaging | Fold alignment and stack neatness |
| PLC touchscreen | Central control and parameter entry | Error messages and saved recipes |
How to Operate a Toilet Seat Cover Making Machine: Step-by-Step
Follow this sequence every shift. It applies to both ultrasonic-welded and glued machines, and it is the same sequence used by factory operators who run a toilet seat cover making machine all day.
Step 1 — Perform the Pre-Start Safety Check
Every shift on a toilet seat cover making machine starts with the same five-minute check. Before powering on, confirm that all guards are in place, the emergency stop button works, and the work area is clean. Check the compressed air supply — most lines need about 0.6–0.8 MPa — and make sure there is no material jam left from the previous shift.
Step 2 — Load the Raw Material Rolls
Mount the nonwoven roll (and the PE film roll on waterproof lines) on the material rack, align the roll edges and fix the core in place. On glued machines, also load the release paper roll, which is typically 1.5–2.5 cm wide. Splice the end of the old roll to the new one so the line does not need to stop.
Step 3 — Thread the Material Through the Line
Follow the material-path marks on the frame, passing the web through the tension rollers, sealing unit and folding section. Make sure the web lies flat with no folds before you close the guards. On ultrasonic machines, confirm the film and nonwoven enter the sealing unit at the same level.
Step 4 — Set the Parameters on the Touchscreen
On the PLC screen, enter the cover length, width, folding mode, production speed and sealing energy (or adhesive amount on glued machines). Use the values from the technical specification sheet of your toilet seat cover making machine as the starting point, and save them as a recipe so the next order can be recalled with one touch.
Step 5 — Run a Trial Batch
Start the line at low speed and run 10–20 trial pieces. Inspect each one: the edges should be fully sealed or evenly glued, the punched contour should be clean, the dimensions should match the set values (cutting error within about 3 mm), and the folds should be tight and even. Adjust parameters if needed, then run another short batch to confirm. This trial step is the one that beginners on a toilet seat cover making machine should never skip.
Step 6 — Run Continuous Production and Monitor
Once the trial pieces pass, raise the speed to the normal operating range — typically 80–100 pieces per minute on automatic lines. Check the output every 15–30 minutes: watch for wrinkles, film stretching, adhesive build-up on the nozzle or suction drum, and any change in cover dimensions. A stable operator is the best quality sensor a line has.
Step 7 — Change Over to a Different Size
To produce a different cover size or folding style, simply enter the new parameters on the touchscreen and run a fresh trial batch. Because a modern toilet seat cover making machine has no mechanical retooling, a complete changeover usually takes only a few minutes.
Step 8 — Shut Down and Clean
At the end of the shift, stop the feed and let the remaining material run through. Turn off the machine at the main switch, release the air pressure, then clean the sealing unit or glue nozzle, wipe the sensors and remove scrap from the cutting area. A clean machine starts faster the next morning.
| Phase | Key Actions | Typical Time |
|---|---|---|
| Pre-start check | Guards, emergency stop, air pressure, area clean | 5–10 min |
| Material loading | Mount rolls, align edges, splice | 10–20 min |
| Parameter setting | Enter size, speed, sealing or adhesive values | 5–10 min |
| Trial run | 10–20 pieces, visual and dimensional inspection | 5–10 min |
| Continuous run | Monitor quality every 15–30 min | Whole shift |
| Shutdown and cleaning | Run out material, clean sealing unit and sensors | 10–15 min |
Ultrasonic-Welded vs. Glued: Which Line Are You Running?
Before you start, identify which of the two main designs your toilet seat cover making machine uses, because the sealing step is handled differently. Both designs are common, and choosing the right toilet seat cover making machine for a factory depends mainly on the finished product's target market. The table below summarises the practical differences.
| Feature | Ultrasonic-Welded Machine | Glued Machine |
|---|---|---|
| Raw materials | PP nonwoven + PE film | Laminated paper, laminated nonwoven, release paper |
| Sealing method | Ultrasonic welding, about 20–35 kHz | Spray adhesive with suction-drum transfer |
| Typical product | Soft, waterproof pocket-style covers | Covers with adhesive strips for fixing |
| Typical output | 80–100 pcs/min | 80–100 pcs/min |
| Operator requirement | 1 | 1 |
| Typical installed power | About 7–10 kW | About 15 kW |
Safety Rules Every Operator Must Follow
Industrial converting lines run fast and use heat, pressure and compressed air, so safety rules are not optional. No matter which toilet seat cover making machine you operate, the rules below apply. This section summarises the practices that modern machinery safety standards — such as international machinery safety standards — are built around.
Never remove or bypass safety guards, interlocks or light curtains while the machine is running.
Keep hands, tools and loose clothing away from rollers, the sealing unit and the cutting module during operation.
Know where the emergency stop buttons are and test them at the start of every shift.
Only qualified electricians may open the electrical cabinet; these lines typically run on 380 V / 50 Hz three-phase power.
Use lockout-tagout procedures before any cleaning or maintenance that requires reaching inside the machine.
Wear appropriate personal protective equipment — ear protection near ultrasonic units and cut-resistant gloves for material handling.
Simple Daily Maintenance That Keeps the Line Running
A toilet seat cover making machine does not need heavy maintenance, but it does need a consistent routine. Small problems — a dusty sensor, a worn blade, a sticky nozzle — become big problems when they are ignored for weeks.
| Frequency | Task |
|---|---|
| Daily | Clean the sealing unit or glue nozzle; wipe sensors; remove scrap from the cutting area |
| Weekly | Check tension and material path for wear; inspect blades and moulds for edge wear; check air filters and drain condensate |
| Monthly | Lubricate moving parts as per the manual; verify cutting accuracy; check electrical connections and emergency stops |
Troubleshooting Common Problems
Even a well-run toilet seat cover making machine occasionally produces defects. Most problems have simple causes, and the table below covers the ones beginners meet most often.
| Symptom | Likely Cause | What to Do |
|---|---|---|
| Wrinkles on the covers | Uneven tension between nonwoven and film | Re-check tension settings; verify roll alignment |
| Unsealed or weak edges | Insufficient ultrasonic energy or worn horn | Increase energy slightly; inspect the horn and anvil |
| Cover size deviates more than 3 mm | Feed roller slip or loose servo sync | Check traction rollers; recalibrate feed length |
| Adhesive residue on covers | Clogged nozzle or excessive adhesive | Clean the nozzle; reduce adhesive amount |
| Machine stops mid-run | Sensor triggered by jam or misalignment | Clear the jam, reset the sensor, restart the line |
Key Technical Specifications to Evaluate
Whether you are learning to operate a machine or planning to buy one, the specification sheet is the fastest way to understand what a toilet seat cover making machine can do. The values below reflect the typical range on mainstream automatic lines and are a useful baseline for comparing quotes.
| Specification | Typical Value / Range |
|---|---|
| Production speed | 80–100 pcs/min |
| Qualified rate | ≥ 99% |
| Installed power | 7–15 kW depending on the model |
| Power supply | 380 V / 50 Hz / 3-phase |
| Air pressure | 0.6–0.8 MPa |
| Raw-material roll diameter | Up to about 1000 mm |
| Finished cover size | Pocket-style about 700 mm long × 150 mm wide; glued-type expands to about 62 × 65 cm |
Where Disposable Toilet Seat Covers Are Used
The market for these products explains why so many factories invest in a toilet seat cover making machine. Disposable covers are a standard consumable in several industries:
Hospitality and travel: hotels, airports, airlines, high-speed trains and cruise ships
Medical and maternity care: hospitals, maternity wards and outpatient clinics
Public restrooms and events: shopping centres, amusement parks and large public events
Retail: travel-size packs sold in supermarkets and convenience stores
Conclusion
Operating a toilet seat cover making machine is a practical skill that any factory worker can learn in a short time. The sequence never changes: check the machine, load the material, set the parameters, run a trial, monitor the output, and clean up at the end of the shift. The equipment does the repetitive work; the operator's job is to keep the line safe, clean and consistent.
For businesses that supply hotels, hospitals or retailers, a well-operated toilet seat cover making machine turns inexpensive rolls of nonwoven into a steady stream of finished products at a predictable cost per piece — with low labour, consistent quality and very little waste. If you are evaluating machines for a new line, the specification table above is a practical starting point for comparing models side by side.
Looking for a reliable toilet seat cover making machine manufacturer?
JUJIN is a direct factory with more than ten years of experience in disposable hygiene equipment. Its engineers can recommend the right model — ultrasonic-welded or glued — based on your raw material, product size and target output, and provide installation support and operator training.
E-mail: sales5@jujin-machine.com | WhatsApp: +86-13306111722
Frequently Asked Questions
Is a toilet seat cover making machine difficult to learn?
No. Modern machines use touchscreen PLC control, and operators only enter parameters, load material and monitor output. With proper training, most beginners run the line independently within a few days.
What raw materials do I need?
PP spunbond nonwoven of 20–40 g/m², plus PE film if you produce waterproof pocket-style covers. Glued-type machines use laminated paper or laminated nonwoven together with release paper (typically 1.5–2.5 cm wide).
How many pieces per minute can it produce?
Typical automatic lines run at 80–100 pieces per minute, and output varies with cover size and folding style. The qualified rate is normally 99% or higher when the machine is correctly set.
Can one machine produce different sizes?
Yes. Operators change cover length, width, folding mode and speed on the touchscreen, usually in minutes and without mechanical retooling. Saving the settings as recipes makes repeat orders even faster.
How many operators are needed?
An automatic toilet seat cover making machine normally requires one operator for supervision, material splicing and quality checks. Larger orders with frequent roll changes may justify a second person.
What daily maintenance is required?
Clean the sealing unit or glue nozzle, wipe the sensors and remove scrap from the cutting area at the end of each shift. A weekly check of blades, moulds and tension rollers keeps the line consistent.
Can it connect to a packaging machine?
Yes. The conveying mechanism of a toilet seat cover making machine is designed to dock with flow-wrapping or bagging machines, forming a fully automated production line from raw material to packed product.


